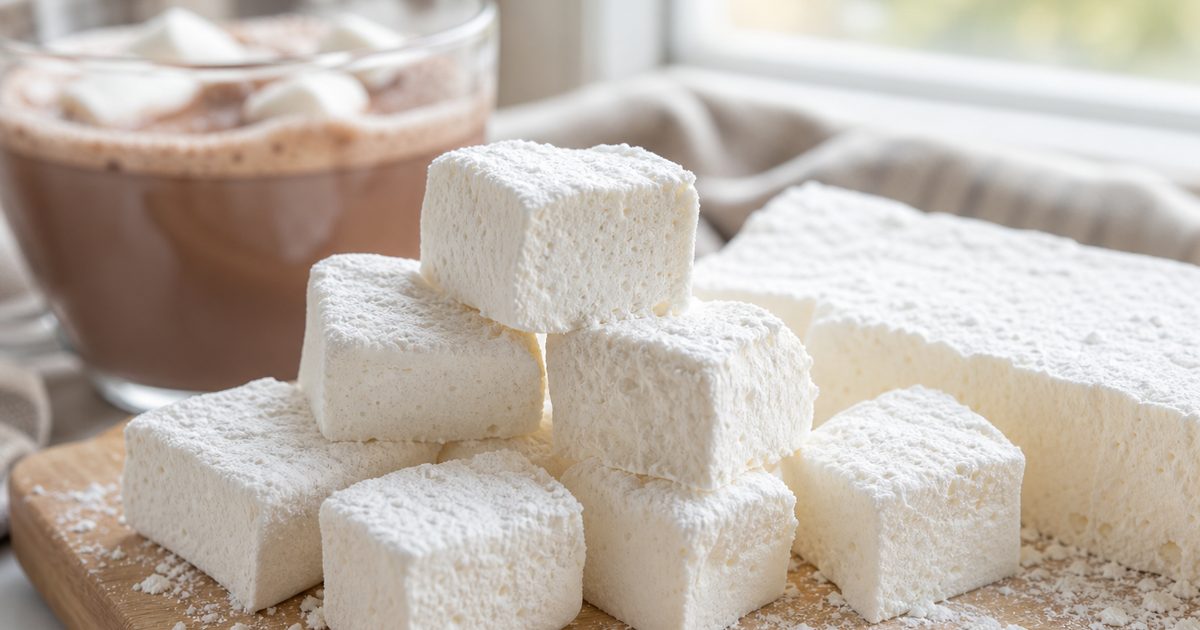
A warm mug of cocoa gets a lot better when the marshmallow on top actually tastes like something. These collagen marshmallows are soft, springy, and lightly sweet, with vanilla in the background and a clean finish from honey or maple syrup. They take a little attention, but the method is simple once you know what to watch for.
Unlike store-bought marshmallows, these homemade squares rely on gelatin for structure and use collagen peptides as an optional add-in. The result is a fluffy treat you can cut into neat cubes for hot chocolate, coffee, or s’mores. If you have been looking for collagen marshmallows that feel doable at home, this version keeps the ingredient list short and the instructions clear.
What you’ll need for collagen marshmallows
This recipe makes about 30 to 40 collagen marshmallows, depending on how large you cut them.
Prep time: 20 to 40 minutes
Cook time: 3 to 15 minutes
Set time: 3 to 6 hours, or overnight
Total time: about 2 hours 40 minutes to overnight
Yield: 30 to 40 marshmallows
Pan: 9×9-inch (23×23 cm) glass or ceramic baking dish
Ingredients
- 6 tablespoons unflavored gelatin powder (about 54 g)
- 4 tablespoons collagen peptides powder (about 28 g), optional
- 2 cups filtered water (473 ml), divided
- 1 1/2 cups honey or maple syrup (360 ml)
- 3 teaspoons vanilla extract (15 ml)
- 1/8 teaspoon sea salt
- 1/2 cup tapioca starch or arrowroot powder (about 60 g), for coating
- Coconut oil, for greasing the pan
Allergen and ingredient notes
These collagen marshmallows do not usually contain dairy, gluten, eggs, nuts, soy, or shellfish. Still, always check labels on gelatin, collagen, vanilla, and starch if you are cooking for someone with allergies or celiac disease.
Gelatin is animal-derived, so this recipe is not vegetarian. Collagen peptides are also animal-derived.
Why collagen marshmallows set properly
The key step is the syrup. You need to cook the honey or maple syrup mixture until it thickens clearly, or until it reaches 240°F (116°C) on a candy thermometer. That temperature is called soft-ball stage, and it gives the marshmallows enough structure to hold their shape after whipping and setting.
The second key step is the mixing time. As the hot syrup hits the bloomed gelatin, the mixture starts thin, then turns glossy, pale, and fluffy. Stop too soon and your collagen marshmallows may stay loose. Whip too long and the mixture can stiffen in the bowl before you spread it into the pan.
The starch coating matters just as much. Tapioca starch or arrowroot powder keeps the slab from sticking to the pan, the knife, and your fingers.
How to make collagen marshmallows
- Grease a 9×9-inch baking dish with coconut oil.
- Dust the greased dish generously with tapioca starch or arrowroot powder. Coat the bottom and sides well, then set the dish aside.
- Pour 1 cup (237 ml) cold water into the bowl of a stand mixer. Sprinkle the gelatin over the water. Whisk briefly, then let it sit for 5 to 10 minutes so the gelatin can bloom.
- In a medium saucepan, combine the remaining 1 cup (237 ml) water, honey or maple syrup, and sea salt.
- Bring the mixture to a boil over medium heat. Stir at first to combine.
- Continue boiling until the syrup visibly thickens, about 3 to 5 minutes, or cook it without stirring until it reaches 240°F (116°C) on a candy thermometer.
- Remove the saucepan from the heat.
- Turn the mixer to low speed. Carefully pour the hot syrup into the bloomed gelatin in a slow stream. Keep the syrup away from the whisk so it does not splatter.
- Increase the speed gradually to medium-high. Whip for 10 minutes.
- Add the vanilla extract and collagen peptides, if using. Continue whipping for 10 to 15 minutes, until the mixture looks thick, fluffy, and pale and holds soft peaks.
- Work quickly. Scrape the mixture into the prepared pan and spread it evenly with a lightly oiled spatula.
- Dust the top with more tapioca starch or arrowroot powder.
- Let the pan sit at room temperature for at least 6 hours or overnight, or refrigerate for 3 to 5 hours until fully firm.
- Invert the slab onto a cutting board dusted with more starch.
- Dust a sharp knife with starch and cut into 1-inch (2.5 cm) squares.
- Toss each piece in more starch so the sides stay dry and easy to handle.
Texture cues that help with collagen marshmallows
A timer helps, but your eyes matter more here.
The syrup should look thicker than plain simmering sweetener before you remove it from the heat. If you use a thermometer, trust the number. At 240°F (116°C), you are in the right zone.
During whipping, the mixture changes a lot. It starts translucent and loose. Then it turns opaque, pale, and full of body. For good collagen marshmallows, you want soft peaks and a mixture that is still spreadable. If it clings to the whisk in heavy clumps and resists the spatula, you have gone a little too far.
After setting, the slab should feel firm on top and spring back lightly when pressed.
Tips to keep collagen marshmallows from sticking
Sticky homemade marshmallows are common, and the fix is simple: use more starch than you think you need.
Dust the pan well. Dust the top before the slab sets. Dust the board before turning the marshmallows out. Dust the knife before every few cuts. Then coat each square again after cutting.
If you want especially tidy collagen marshmallows, wipe the knife clean and redust it as needed. That small step makes the edges look much neater.
Substitutions and flavor ideas
This recipe gives you a solid base, and a few small changes work well.
- Honey or maple syrup: You can use either one. Honey gives a fuller flavor. Maple syrup gives a slightly deeper, caramel-like note.
- Tapioca starch or arrowroot powder: Either works for coating.
- Collagen peptides: You can leave them out. The gelatin does the actual setting, so the marshmallows will still firm up.
Be careful with bigger changes. The original ingredient list does not support a reliable sugar-free swap, so it is better not to assume one will behave the same way in the pan. The same goes for adding cocoa or extra flavor powders. Those additions can change the texture if you do not rebalance the mixture.
If you want to vary the flavor without changing the structure much, switch the sweetener from honey to maple syrup, or keep the vanilla and serve the collagen marshmallows in different ways.
How to store collagen marshmallows
Store the finished marshmallows in an airtight container.
- Refrigerator: 2 to 7 days
- Room temperature: up to 1 week, if they are coated well with starch and your kitchen is not hot or humid
Layer parchment paper between rows if needed to reduce sticking. If the pieces start to feel tacky in storage, toss them with a little more tapioca starch or arrowroot powder before serving.
These do not need reheating, but you can toast them for s’mores or let them melt into hot drinks.
Ways to use collagen marshmallows
A few cubes in hot chocolate are the obvious move, but there is more you can do with them.
Drop one into coffee and let it soften on top. Toast them for s’mores. Cut them smaller and add them to dessert boards. They also make a nice homemade gift if you pack them in a tin or box with parchment between the layers.
Because these collagen marshmallows hold their shape well, they work nicely anywhere you want a homemade marshmallow that stays tender instead of turning gummy.
Food-safety notes
This recipe does not contain meat or eggs, so there are no meat or egg temperature targets to follow. Still, hot sugar syrup can cause serious burns.
Use a deep saucepan to reduce bubbling over. Pour the syrup slowly into the mixer bowl. Keep hands clear of the whisk, and do not let children handle the hot syrup.
Also make sure all equipment is clean and dry before you start. Moisture on tools or in storage containers can make homemade marshmallows sticky faster.
FAQ about collagen marshmallows
Why add collagen to collagen marshmallows?
Collagen peptides are optional here. They add collagen, but they do not replace the gelatin. Gelatin is what gives the marshmallows their structure.
Can I make collagen marshmallows without a stand mixer?
Yes, a hand mixer can work. It may take longer to whip the mixture to soft peaks, and you will need a large bowl and some patience.
How do I know when collagen marshmallows are done whipping?
Look for a pale, thick, fluffy mixture that holds soft peaks and still spreads into the pan. If it turns too stiff to pour, it has gone a bit too far.
Why are my collagen marshmallows sticky?
Usually the pan, knife, or cut pieces need more starch. Dust generously with tapioca starch or arrowroot powder at every stage.
How long do collagen marshmallows need to set?
At room temperature, plan on at least 6 hours or overnight. In the refrigerator, they usually firm up in 3 to 5 hours.