A hot tray, a soft dough, and the smell of dried fruit in the oven. That is the charm of wartime scones. They are simple, practical, and still worth baking now because they come together fast and use everyday ingredients.
These wartime scones grew out of ration-era home baking, when butter and sugar were limited and cooks had to stretch what they had. The method is straightforward: rub fat into flour, stir in sugar and fruit, then mix with egg and milk to make a soft dough. The finished scones have a tender crumb, a lightly sweet taste, and a golden top. If you have ever looked for a scone recipe from ww11 recipe collections or old British baking notes, this is the kind of recipe you are likely to find.
Prep time is 10 to 15 minutes. Bake time is 15 to 20 minutes. Total time is 25 to 35 minutes, and the recipe makes 6 to 8 scones.
Ingredients for wartime scones
- 5 oz (140 g) self-raising flour
- 1/2 teaspoon salt
- 2 oz (50 g) butter, margarine, lard, or beef dripping, softened
- 1 oz (30 g) granulated sugar, or up to 2 oz (60 g) for a sweeter batch
- 2 oz (50 g) dried fruit, such as sultanas, currants, or chopped dates
- 1 large egg, beaten
- 2 to 4 tablespoons milk, plus extra for brushing
These wartime scones stay true to the practical style of ration baking. Butter works well, but margarine, lard, or dripping also fit the recipe and give slightly different flavor. Sultanas and currants are classic, while chopped dates make the scones a little richer and softer.
Allergen note: This recipe contains gluten, dairy, and egg. If you use beef dripping, note that it is not suitable for vegetarians.
How to make wartime scones
- Preheat the oven to 400°F (200°C). Lightly grease a baking tray.
- Sift the self-raising flour and salt into a large bowl.
- Add the softened fat. Rub it into the flour with your fingertips until the mixture looks like fine breadcrumbs.
- Stir in the sugar and dried fruit.
- Make a well in the center. Add the beaten egg and 2 tablespoons milk. Mix with a table knife or your hand until the dough starts to come together. Add more milk, 1 tablespoon at a time, if needed. The dough should feel soft and slightly sticky, not wet.
- Turn the dough onto a lightly floured surface. Knead it lightly, just until smooth.
- Pat or roll the dough to about 1/2 inch (1 to 1.5 cm) thick.
- Cut out rounds with a 2-inch (5 cm) cutter or the rim of a glass. Press straight down rather than twisting, which helps the scones rise more evenly.
- Set the rounds on the prepared tray. Brush the tops with a little milk or any leftover beaten egg.
- Bake for 15 to 20 minutes, until the wartime scones are well risen and golden on top and around the edges.
- Cool briefly on the tray, then move to a rack. Serve warm or at room temperature.
If you brush with leftover raw egg, make sure the scones bake until the tops are fully set and the centers are cooked through.
The key to tender wartime scones
The biggest mistake with wartime scones is overworking the dough. Once the egg and milk go in, the flour starts forming gluten. Too much mixing or kneading makes the texture heavy and chewy.
Keep the dough soft. Mix only until no dry flour remains, then knead for a few seconds to bring it together. That light handling is what gives these old-fashioned scones their best texture.
It also helps to avoid adding too much extra flour on the work surface. A heavily floured board dries the dough out. Use just enough to stop sticking.
Watch the scones near the end of baking. They should look puffed, feel set when you tap the top lightly, and show a golden brown finish. That tells you more than the clock alone.
Why wartime scones taste different
Modern bakery scones often lean rich and buttery. Wartime scones do not. They are plainer, a little less sweet, and often slightly denser. That is part of their appeal.
They were designed to make the most of limited ingredients, so the recipe relies on good technique rather than richness. The dried fruit brings small pockets of sweetness. The fat keeps the crumb tender. The egg adds structure and color. Nothing is wasted, and nothing feels fussy.
That is also why this kind of bake still works so well for everyday cooking. You can make a batch quickly for breakfast, tea, or an afternoon snack without much planning.
Useful substitutions for wartime scones
This recipe is flexible, which is one reason wartime scones have lasted.
- Fat: Use butter for a fuller flavor, or margarine, lard, or beef dripping for a more traditional ration-era feel.
- Dried fruit: Sultanas, currants, and chopped dates all work well.
- Sugar: Use the lower amount for a less sweet result, or the full 2 oz (60 g) if you want them closer to a tea-time treat.
- Brushing the tops: Milk gives a soft sheen. Leftover beaten egg gives a deeper color.
If you want a savory batch, leave out the sugar and dried fruit. Add 1 oz (30 g) grated hard cheese and a little finely chopped chive or other soft herb. Since the original ingredient list does not specify the herb amount, add just enough to lightly flavor the dough rather than pack it heavily.
Variations on wartime scones
A basic dough like this can shift in a few useful directions.
For carrot and fruit scones, add 8 tablespoons grated carrot, about 1 large carrot, and 3 tablespoons (50 g) sultanas. The carrot adds moisture and a little natural sweetness. If the dough feels wetter after mixing, hold back some of the milk at first and add only what you need.
You can also turn the dough into girdle scones, sometimes called griddle scones. Instead of baking them, cook them on a lightly greased griddle or frying pan over low heat for 10 to 15 minutes per side, until dark golden brown and cooked through. Keep the heat low so the center cooks before the outside gets too dark.
If you make the savory cheese version, remember that it adds dairy beyond the milk already in the dough.
Serving wartime scones
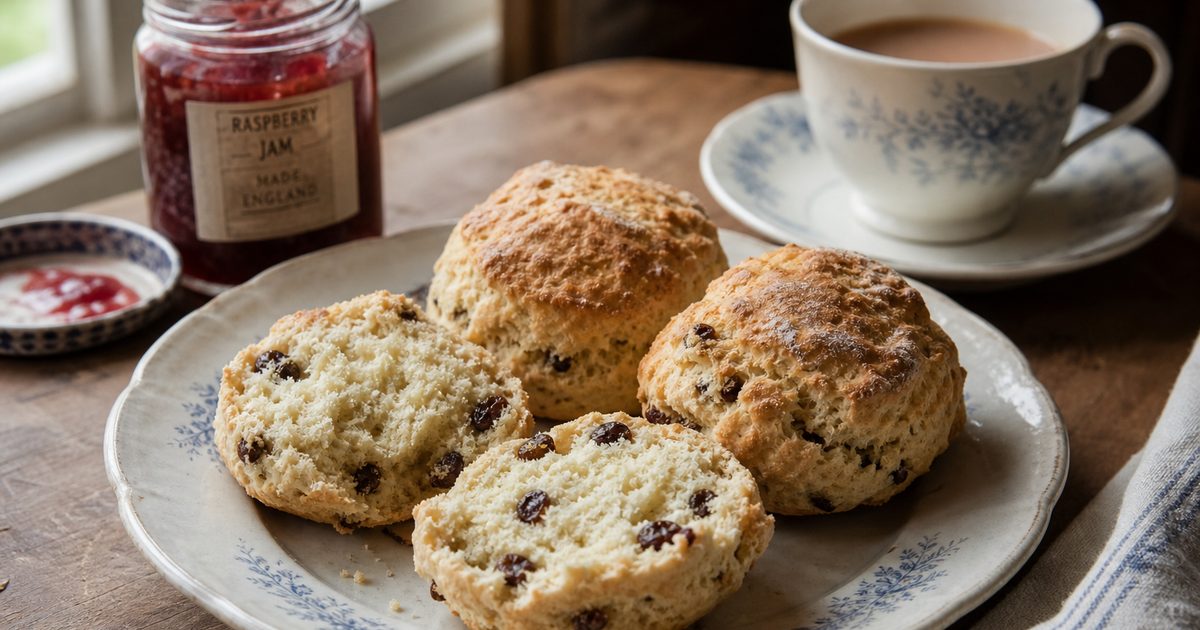
These wartime scones are best the day you bake them. Serve them warm if you can. Split one open and you will see a soft, slightly rustic crumb dotted with fruit.
They are good plain, but you can also serve them with butter if that suits the way you like scones. The sweeter version works nicely with tea. The savory version pairs well with soup or a simple lunch.
Because they are not heavily sweet, they also make a good breakfast bake.
Storing and reheating wartime scones
Fresh is best, but leftovers keep well enough for short-term storage.
- Store cooled scones in an airtight container at room temperature for 1 to 2 days.
- Reheat in a low oven for a few minutes until warmed through.
- Freeze baked and cooled scones in a sealed container or freezer bag. Thaw at room temperature, then warm before serving.
Do not leave them in a damp container, or the tops will soften too much. If you used egg wash, cool the scones fully before storing so condensation does not make them sticky.
FAQ about wartime scones
Why are wartime scones different from modern scones?
They come from ration-era baking, so they use less fat and sugar than many modern recipes. That gives them a plainer, more rustic texture and flavor.
What fat is best for wartime scones?
Butter gives the richest taste, but margarine, lard, or beef dripping are all traditional options. The method stays the same whichever one you use.
How do I stop wartime scones from turning tough?
Mix the dough lightly and knead only until it comes together. Too much handling develops gluten and makes the scones heavy.
Can I make wartime scones savory?
Yes. Leave out the sugar and dried fruit, then add 1 oz (30 g) grated hard cheese and a little chopped herb such as chive.
Can I freeze wartime scones?
Yes. Freeze them after baking and cooling. Thaw at room temperature and warm in the oven before serving.